Customization: 1) At the beginning of the script from step 6, we have this section:

Thursday, May 7, 2015

Strawberry bouquet (Mother’s Day Special)

0
What changes after you have a baby? What not, right? The other day, I was reading a book “The second nine months” by Writer and Mom, Vicki Glembocki. In this book the author shares her experiences of motherhood with extreme honesty, which makes this book an interesting and enjoyable read. Yes, that is true, having a baby changes everything. For me, after I had my baby, I started to respect my parents and love them in a new way. When you have a child, you realize how much your mother means to you and all the things she has done for you. There is no way we can ever really thank our mother. So, just love and treat our Mother !

Planning to make something special on this Mother’s day? What better Mother's Day gift than making something beautifully delicious with your kid? Take a look at my Mother’s day special Strawberry bouquet. Your Mom will also love this special treat.

To make this Strawberry bouquet,

You will need
Medium-Large size strawberries- 10
White and dark chocolate chips or bars- 6 oz in each bowls
Red, liquid food coloring
Skewers, cut them to different lengths
Glass, to hold the strawberry skewers
Lettuce for decoration
Sprinkles
Coconut flakes

Follow these steps
Step 1: Wash and completely dry the strawberries.

Step 2: Put white chocolate chips into two separate bowls and dark chocolate chips into another bowl. Microwave them for 15 seconds intervals (removing and stirring at each 15 second interval) until you get smooth chocolate melts.

Step 3: Place the strawberries on skewers, do not put skewer through the entire strawberry.

Step 4: Add red liquid food coloring into two white chocolate melts bowls to dye the chocolate melts until you get Barbie pink (light) color in one bowl and baby pink color in another bowl. Keep the dark chocolate melt aside.

For making Chocolate covered Strawberry Roses, follow these steps

Step 5: Dip the skewered strawberry in Barbie pink chocolate melt and drizzle the Baby pink chocolate melt on top of it using a spoon (or put them into a zip-top plastic bag and snip a hole in one corner of the bag). Place the decorated strawberry skewers in the glass to get dried.

For making Chocolate covered Strawberry Coconut, follow these steps

Step 6: Dip the skewered strawberry in dark chocolate melt and sprinkle coconut flakes over this until well coated. Place them in the glass to get dried.

For making Chocolate covered Strawberry with Sprinkles, follow these steps

Step 7: Dip the skewered strawberry in dark chocolate melt and sprinkle them with Sprinkles. Place them in the glass to get dried.

Step 8: Place all the decorated strawberry skewers in a Vase or Mason jar and keep them in the freezer for about 20 minutes to completely dry them. 
Arrange the jar with lettuce and skewered blueberries.

Wow, how gorgeous this strawberry bouquet! 


All you need


Skewered strawberries


Put the chocolate chips in each bowls and melt them


Dip the strawberries in dark chocolate melt and sprinkle with Sprinkles


Sprinkle coconut flakes over chocolate dipped strawberries


Dye white chocolate melts and decorate the strawberries with them


Decorate the dipped strawberry with dark chocolate melt


Place them in vases and keep them in freezer


Strawberry Bouquet is ready!


HAPPY MOTHER'S DAY!


Read More »

Saturday, May 2, 2015

Mini French Fries (For age: 15+ months)

0
It was such a great Kite Fest we had in the community last weekend. That was our son’s first Kite Festival. He was so excited and I never thought he would enjoy it that much. There were many of them in different colors and shapes also there was a booth where children could decorate and make their own kites.
We didn’t fly one this year but hope to fly one next year when he becomes big!. It’s definitely fun for kids and adults too. If you haven't been to Kite Festival, go next time.


When we got back home in the evening after all that fun, I thought of making something crunchy to munch. OK, why not some mini French Fries, I was sure that our little-one will like it. French Fries are easy to make, but to get them perfectly golden and crispy, is not that easy. The starch in the potatoes interferes with the texture of the Fries and never allows them to become nice and crisp. But no worries, there are few tricks and tips to make them perfect.

Here are my tricks and tips for making perfect crisp French Fries! 
Enjoy them with family!

Ingredients (3 servings)
Potatoes- 2 medium size
All-purpose flour- 1 Tsp
Lemon juice- 1 Tsp
Oil, for frying (I chose canola oil)
Parsley flakes, to sprinkle
Salt, to taste


Process
Step 1: Peel the potatoes and cut the round edges off them, so that you have a fairly solid rectangle. Cut them half and then cut each pieces into sticks (your little-ones bite size).

Step 2: Soak the sliced potatoes in cold water for about 15 minutes and drain them well. This will help to remove excess starch on the outside of the potato.

Step 3: This is the tricky ingredient for perfect crispy French Fries. Take a small bowl and mix together all-purpose flour and water until you have the runny consistency. Keep them aside.

Step 4: Heat water in a sauce pan, add salt, all-purpose flour liquid and lemon juice. Stirr them well and bring it to boil.

Step 5: Add all the drained potatoes to this boiling water and cook it for about 4 minutes (fork-tender).

Step 6: Drain them on a bunch of paper towels to dry them off.

Step 7: The tricky step of the process is, you need to keep the drained potatoes (Step 5) in the freezer for about half an hour.

Step 8: Heat oil for deep frying over medium heat (around 320 degrees). Add frozen potatoes to the boiling oil and fry them until they turn golden and crisp. Do it in batches.

Step 9: Remove the Fries from oil and transfer them to the paper towel. Sprinkle with salt and dried parsley. Your crispy French Fries are ready to serve.


Serve hot. Keep them in tight container and they will stay crispier longer.


Ingredients


Peel the potatoes and cut them half

Cut the potatoes into pieces

Soak the potato pieces in water

The KEY ingredient: All-purpose flour in water


Boil the potatoes until fork-tender


Drain the boiled potatoes and freeze them


Fry the frozen potatoes


Transfer them to paper towel and sprinkle with salt and parsley flakes


SERVE and ENJOY!


Read More »

Wednesday, April 29, 2015

Strawberry Pancake (For age: 12+ months)

0
“Breakfast is the most important meal of the day” too often we hear this, right? Ya, we all love to have something savory, salty or sweet for breakfast to start our day. Yes, we do enjoy our breakfast. But, what about our kids? I know, there are few Moms who are having a hard time giving breakfast to their kids. I was one of them. Every morning it was the same struggle for me to get him to eat his breakfast. I feel bad trying to force him to eat. Yes, that was a tough time for me. I took some more time to get him into the routine of eating his breakfast. Later I realized that, he likes a little variety everyday. So I started to offer different things and YES, that worked.

There are so many great breakfast recipes around you.  Here is another one that turned out perfect for my son! Strawberry Pancake. What I love about pancake is how easy it is to make. You can make funny shapes with the batter, you can change the color, and you can add whatever you want into the mix. Few days back, I tried this delicious strawberry pancake recipe and I got thrilled with the way my son and husband tasted it. This pancake recipe is an amazing way to enjoy breakfast with your little-one.

So here’s how you make this:

Ingredients (4-6 servings)
All-purpose flour- 1 cup
Milk- 1 cup
Egg- 1
Butter, melted- 1 Tbsp
Strawberries- 4 large size, sliced 
Baking powder- 1 and 1/2 Tsp
Sugar- 1 Tbsp
Salt, to taste

Process
Step 1: In a medium bowl, whisk together the flour, egg, baking powder, melted butter, sugar and salt.

Step 2: Place the sliced strawberries in a microwave safe bowl and cook at high power for 2 minutes (or until strawberries are soft). This is needed, since if you use them fresh, the moisture in the strawberries will make mushy battery taste pancake. 

Step 3: Lightly mash the strawberries with a spoon and add this strawberry sauce to the batter already prepared (Step 1), and mix until everything well combined.

Step 4: Now start adding milk until you get the desired consistency. This should yield a very light pink color batter. I usually keep the batter thin while I make it for my son.

Step 5: Heat the pan over medium heat and lightly coat it with butter. Add batter into the pan and cook for about 1-2 minutes until bubbles start to form in the batter. Flip them with a spatula and cook until golden brown, about 2 minutes more. Repeat with remaining batter. 

Delicious strawberry pancakes are ready to serve. Serve it with butter and some fresh cut strawberries. 


KEEP CALM AND EAT PANCAKE


Read More »

Sunday, April 19, 2015

Bow Tie Alfredo (For age: 12+ months)

0
Pasta is such a kid favorite food. Oh, my son is obsessed with pasta. That is the only time he clears his plate. He says “PISTHA PISTHA” so sweet. 
This pasta dish is one of those minimal ingredient dishes that takes only a few minutes to prepare. You can choose any pasta for this recipe, or you can chop regular pasta into tiny pieces. I like to buy special baby pasta shapes from the supermarket, especially these beautiful butterfly shaped Bow tie pasta.

So delicious, and I am sure your kid will love this.


Ingredients (1 serving)
Pasta (bow tie shape)- 50 g
Heavy cream- 4 oz
Garlic- 2 cloves minced
Parmesan cheese- 1/3 cup
Olive oil- 1 Tbsp
Parsley (Chopped)-1 Tbsp
Salt and black pepper, to taste

Process
Step 1: In a sauce pot, cook pasta as directed on package. (I usually cook pasta 10 minutes in boiling water with salt).

Step 2: Heat a large skillet over medium heat and add olive oil and garlic. Saute until garlic color just turns brown.

Step 3: To this, add heavy cream, half portion of parmesan cheese and parsley. Stir well until get a smooth consistency. Turn the heat to low and add pasta to this alfredo sauce, and toss it well for about 1 minute.

Now pasta is ready to plate. Sprinkle the other half of parmesan and parsley on top. 

Serve it immediately! 


HAPPY COOKING!


Read More »

Thursday, April 16, 2015

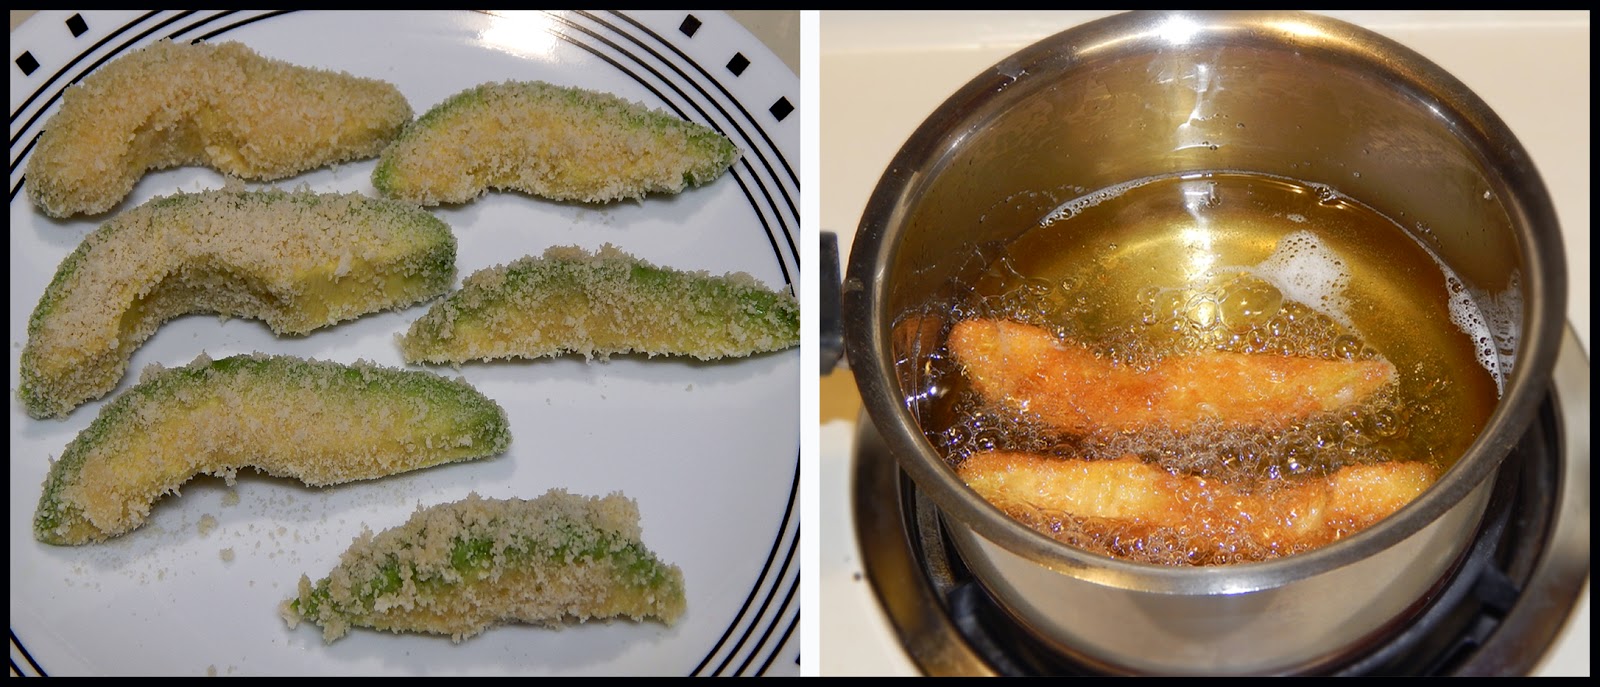
Avocado fries (For age: 15 months+)

2
Is that a big deal if your little-one doesn’t like avocado? Don’t worry, there are plenty of other super foods to offer. But, don't completely give up on avocado. Because, one day they will realize that many of the foods they avoided as a kid are actually beneficial for their health.  

Come, let’s satisfy that fussy eater with this yummy avocado fries. Believe me, they are wonderful in taste, creamy inside crunchy outside!

Ingredients (1 serving)
Firm-ripe avocado-1/2 (cut in half and slice into wedges)
Egg-1
All purpose flour-1 Tsp
Bread crumbs- 1/2 Cup
Oil, for frying (I chose canola oil)
Salt and black pepper, to taste
       
Process
Step 1: In a bowl, whisk together the egg, salt, pepper, and flour.

Step 2: Dip the sliced avocados in egg mixture and then to the bread crumbs to coat.

Step 3: Place them in the hot oil and fry them (turning them as needed) until deeply golden brown and crispy. 

Step 4: Drain them on a paper towel.

Sprinkle some parmesan over this if your little-one loves cheese.

Serve immediately!


HAPPY COOKING!


Read More »

Tuesday, April 14, 2015

Stir-Fried Baby Spinach (For age 9+ months)

0
I was not a big fan of spinach dishes when I was a kid. But I do remember liking fried spinach made by my mother. Recently I had a very different spinach dish made by my husband’s grandmother, Wow, does any spinach dish can get better than that? May be not. I will try to share some of their recipes later in this blog.
OK, let's talk about spinach, yes everyone knows that it is one of the healthiest foods of all time. But some of us have a hard time incorporating it into our diet, especially kids diet.  I know there are many Moms like me, who are struggling to give green to their kids but we need to find the way they do like those super foods. If you are looking to make a simple side dish with spinach, this recipe is great! Easy to make, and it requires very few ingredients.

Ingredients (4 servings)
Baby spinach- 10 oz
Coconut oil- 2 Tbsp
Lemon juice- 1 Tbsp
Salt and pepper, to taste 

Process
Step 1: Chop the whole spinach.

Step 2: Add the chopped spinach to a large frying pan and cook it (do not cover it) over medium heat for about 5 minutes. Since the spinach is so full of water, it immediately begins to release liquid upon contact with the hot pan.

Step 3: As the spinach cooks down, add salt and gently toss and turn the spinach, in such a way that all of the unwilted leaves make contact with the bottom of the pan.

Step 4: Keep stirring and cooking the spinach until the liquid completely evaporates.

Step 5: Once the liquid completely evaporates, add coconut oil and pepper. Keep stirring until you see the spinach starts to come off from the bottom of pan. Add few drops of fresh lemon juice over spinach. Do not over fry spinach, since it will loose all the nutrients. So keep the green color.

Now it is ready to serve. You can serve it with Rice/ Chicken/ Mashed potatoes.  


HAPPY COOKING!


Read More »