Customization: 1) At the beginning of the script from step 6, we have this section:

Monday, December 19, 2016

Funnel Cake

0
Whenever I think about Funnel Cake, my mouth will be drooling always, because Funnel Cake is one of my favorite Carnival foods. Whenever we go to Carnivals, the first thing I do is, run to a food truck and stay in line to buy Funnel Cake. I never tried to make it at home. But few days back, while I was watching a Cooking show on TV and my little boy was with me. That show was about Carnival foods, and they were showing variety of foods and while they were showing about Funnel Cake, my son was telling me, “Mama I want to go inside TV and eat that Funnel Cake”. So I thought, why should I wait for next carnival? Let us make it at home.

Cooking funnel cake is easy if you have the ring and Funnel Cake pitcher or Funnel. So I bought it from store. So it was very easy for me to make it.

I hope you all will try to make this Funnel Cake and hope your family will love this.

Funnel Cake


Wishing all my readers a MERRY CHRISTMAS and a HAPPY NEW YEAR!!

Ingredients:
All-purpose flour- 1 cup
Baking soda- ½  Tsp
Salt- ½ tsp
Sugar- 1 Tsp
Egg- 1
Vanilla extract- ½ Tsp
Milk- 1 cup
Powdered sugar

Method:
Step 1: Mix all the dry ingredients together (All-purpose flour, baking soda, salt and sugar).

Step 2: Mix all the wet ingredients together (Beat egg and mix with milk and vanilla).

Step 3: Pour wet ingredients into dry ingredients. Mix them using a whisk or hand mixer until you get a smooth batter (Pancake batter consistency or little thicker than Dosa batter consistency). Transfer batter into pitcher.

Step 4: Heat oil in a pan and when oil becomes hot, insert the ring into the oil and pour batter into oil. (If you don’t have ring, just pour batter in a zig zag way and across). Cook until one side becomes golden brown and then flip it. When both sides cook very well (golden color on both sides), transfer Funnel Cake to a paper towel and sprinkle with powdered sugar.

Ahhh the famous Funnel Cake is ready to serve!! Don’t forget to have a bite before you serve!

Dry ingredients and milk

Mix egg, milk and vanilla extract together

Mix dry and wet ingredients together

Funnel Cake pitcher and Ring

Cook Funnel Cake until both sides become golden brown


HAPPY COOKING!
Read More »

Wednesday, November 16, 2016

Pomegranate Apple Smoothie

0
If you are looking for a finger food for your little one, pomegranate is the best. They are delicious, at the same time nutritious too. It has great antioxidant, antiviral and antitumor properties. I started giving pomegranate to my son when he was 1 and half years old. He loves pomegranate. I usually give him fruit (seeded) as such and sometimes I make smoothie by adding another fruits along with pomegranate. Juicing is a great way to get lots of healthy fruits and veggies into your family diet. This time, I am sharing “Pomegranate Apple Smoothie” recipe with you all. Hope you will enjoy this!!


Ingredients:
Pomegranate: ½ cup
Apple:1
Milk: ½ cup
Almond or cashew: ~4
Sugar (optional): 1 Tsp


Method:
Step 1: Peel, core and cut apple.

Step 2: At first blend pomegranate alone until the seed completely grinds. Then add all other ingredients and blend until you get a smooth smoothie.


Serve fresh 

HAPPY COOKING!
Read More »

Tuesday, October 25, 2016

Pasta Marinara (For Toddler)

0
Before I talk about my recipe “Pasta Marinara”, I need to tell you about Marinara sauce. It is an Italian sauce made with tomatoes, onion, garlic and herbs. You can easily make it at home. But I usually buy organic marinara sauce from grocery store. If you have marinara sauce in hand, you don’t have to worry about kids’ dinner and for their lunch box too.

"Pasta Marinara" is an incredibly easy pasta recipe and you can make it for your whole family and kids. Enjoy!

Pasta Marinara

Ingredients
Pasta- 50 Gram (I chose shell pasta, tricolor)
Marinara sauce- 4 Tbsp
Parmesan cheese
Salt and pepper, to taste

Method
Step 1: Cook pasta for about 10 minutes by adding salt.

Step 2: Drain water from pasta and keep it aside.

Step 3: Heat pot over medium heat and add marinara sauce and pepper (1/3 Tsp). Stir sauce until it thickens and all water evaporates.

Step 4: Now add cooked pasta and stir very well. Turn off heat and add cheese.

Step 5: Check for salt and pepper. Pasta Marinara is ready to serve. How easy this recipe is!!


Sprinkle some parmesan cheese just before serving. Your kids will love that!! 

Ingredients: Pasta, marinara sauce, parmesan cheese

Add marinara sauce in a pot and boil it until it becomes thick

Mix cooked pasta with sauce and stir very well.


HAPPY COOKING!

Read More »

Wednesday, September 21, 2016

Popcorn Chicken (For Toodler and Family)

0
Kids love to eat food from outside. Yes, I am talking about fast food. I am not arguing whether fast food is healthy or unhealthy, but I usually don’t take my son to eat fast food. I always prefer homely food. But once in a while eating from out is fun. Few days back while we went to KFC, I noticed that my son was eating Popcorn chicken and he said “It is yummy Mamma”. The same day during dinner time he asked for Popcorn Chicken. So I thought I need to try it at home. Super easy, almost same taste KFC Popcorn chicken I could make at home. This is great for family too. Hope you will enjoy this recipe!


 Ingredients
Chicken- ~250 Gram, Boneless chicken fillet
All purpose flour- ½ cup
Egg-1
Paprika or chilly powder- ½ Tsp
Turmeric powder- 1/3 Tsp
Fennel seed powder- 1/3 Tsp
Pepper powder- ½ Tsp
Salt, to taste
Lemon Juice- 2 Tbsp
Vegetable oil, for deep frying

Method
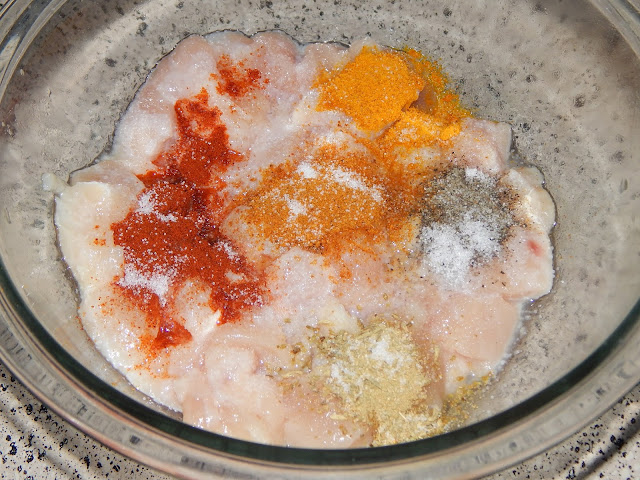
Step 1: Wash and cut chicken into small cube shape pieces. Marinate chicken with paprika, turmeric powder, fennel seed powder, pepper powder, lemon juice and salt. Mix it very well. Keep it aside for 10 minutes.

Step 2: Beat egg and pour it into chicken pieces. Mix them very well.

Step 3: Spread all-purpose flour in a baking pan or sheet and coat each chicken pieces with flour. Coat them very well.

Step 4: Heat oil in a pan and deep fry each chicken until they turn golden brown in color. Drain them on a paper towel.


Step 5:Popcorn chicken is ready to eat. Serve warm with ketchup.

Cut chicken into cube shape pieces


Marinate chicken with spices and lemon juice

Beat egg and add this to chicken pieces

Coat each chicken pieces with all-purpose flour

Fry chicken until they turn brown in color

HAPPY COOKING


Read More »

Wednesday, August 24, 2016

Peach Cobbler (For Toddler)

0
I love seasonal fruits. Because seasonal fruits taste great since they are freshly harvested. Peaches are very much seasonal, right now in Texas we have peaches everywhere in farmers market. My son is not a big fan of fresh peach, so I was looking all over my recipe books for peach fruit recipe. As you all may know when you look for a peach recipe “Peach Cobbler” would be in first place. As always I read lot of peach cobbler recipes but I made my own "Peach Cobbler" with some modifications. It was really good, my whole family loved it. So I thought OK, I need to share the recipe with all my readers. Hope you will enjoy this recipe. Let me know if you try this recipe.


Ingredients

For making Peach filling
Peaches- 5, Medium size
Cinnamon-1 Tsp
Nutmeg- ½ Tsp
Sugar-1/3 Cup
Vanilla- 3 drops
Salt, a pinch

For Batter
All-purpose flour-1 Cup
Butter- ½ cup, unsalted
Egg- 1
Milk- ~1 Cup
Sugar- ½ cup
Baking powder- 1 Tsp
Cinnamon- a pinch

Method:

Step 1: Wash peaches, peel off skin and slice them.

Step 2: Add peaches, cinnamon, nutmeg, vanilla and sugar into a sauce pan and mix them very well. Cook them for about 2 minutes.

Step 3: Now turn on oven to 350 degrees.

Step 4: Add butter into baking pan and melt it. I kept it oven for 30 seconds and got it melted.

Step 5: Now take a large bowl for making batter. Add all-purpose flour, egg, sugar, a pinch of cinnamon and milk into bowl and mix them together until you get a medium thin batter (idly consistency or thinner than pancake).

Step 6: Now add batter into baking pan over melted butter. Add peach mixture into the batter and bake it for about 30-45 minutes or until you see golden color crisp on edges or on top.


Note: In my experience, if your batter is thick, it won’t come upside to cover the peaches. So it will look exactly what you see in my recipe. But I tried with thin batter too and it came upside and covered all the peaches. Both ways it tastes great!

Peeled and sliced peaches

Ingredients for Peach filling

Mix all ingredients together and cook for 2 minutes

Ingredients for batter

Batter for Peach cobbler


Layer all ingredients into a pan and bake at 350 degrees for about 40 minutes

Peach Cobber is ready to serve

HAPPY COOKING!

Read More »

Thursday, August 4, 2016

Coconut Jello

0

Making JELLO is More FUN! Eating JELLO is So much FUN!!

I like to cook when my little buddy is around me helping with scooping flour, spreading butter on bread, whisking egg mixture, spooning sugar (NO salt of course, Hahaa) or stirring. It is really fun, but expect longer time than it usually would. So plan ahead! Also messy messy kitchen! But I looove to see that sweet messy smile J of my little-one when I ask him “Did you mess up Mamma’s kitchen”?

My son is not a big fan of that colorful Jello. Usually he takes one bite. That is it. I obviously don’t want him to eat Jello which we get from outside but I like to make it at home. My son is a big fan of coconut water, so I thought it would be fun to make Coconut Jello (jello with coconut water) with my kid. Coconut water is a natural, nutritious, and refreshing drink which is great for adults and kids too. I chose coconut water with pulp, so he can have a crunchy coconut bite when he enjoys jello.


Enjoy!


Ingredients
Gelatin- 1 Tbsp
Coconut Juice- 1 Cup
Jello mold (optional)

Method
Step 1: Pour coconut juice into a saucepan.
Step 2: Turn the heat on low and add gelatin into juice. Stir constantly until the gelatin is fully dissolved.
Step 3: Boil it for about 5 minutes.
Step 4: Turn off heat and allow it to cool slightly.
Step 5: Pour the gelatin juice mixture to any glass mold or desired shape tray.
Step 6: Refrigerate until fully set (I kept it in refrigerator for overnight).
Step 7: Unmold the prepared Coconut Jello. You can cut into desired shapes.
Ingredients: Gelatin and coconut water

Boil gelatin with coconut water until gelatin fully dissolves in coconut water

Transfer to desired shape trays

HAPPY COOKING!

Read More »

Monday, July 18, 2016

Mango POPSICLES

1
Yes, this is the best time to breakout the summer survival trick, POPSICLES!! A warm weather favorite of grown-ups and little-ones alike. I don’t like to buy Popsicle from stores since it is incredibly simple to make at home. Yesterday, I made some mango Popsicles by adding a spoon of yogurt and pureed strawberry in the middle and my son absolutely loved it. So I thought, Ok I need to share this recipe with my readers. I hope you will enjoy this Mango Popsicle with your little-ones. You can substitute any of your favorite fruits in this recipe like pineapple, blueberries or any fruit blend.

MANGO POPSICLES

Ingredients (For 4 large size Popsicles)
Popsicle makers
Ripe Mangoes- 2 medium size, peeled and cut
Strawberry- 2-3, pureed
Yogurt- 2 Tbsp
Vanilla extract (optional)- 2 drops
Sprinkles (optional)

Method
Step 1: Puree mangoes and strawberry separately until smooth.

Step 2: At first, add some sprinkles into ice pops and then pour spoon full of mango puree, yogurt, and strawberry puree in layers. Finally fill the Popsicle mold with mango puree.

Step 3: Freeze the Popsicles until solid (usually it will take 2-3 hours).

Step 4: To take out Popsicles from molds there is an easy way. Dip the Popsicle holder into room temperature water for about 1 minute and twist the stick gently. Yummy “Mango Popsicles” are ready to enjoy!


Note: Popsicles should be fully frozen before you dip in water, or it will breaking off.

Ingredients: Mangoes, strawberries, yogurt, vanilla extract, sprinkles and popsicle maker

Puree mangoes and strawberries separately until smooth

Layer popsicle make with sprinkles, fruit puree and yogurt

Freeze Popsicles until they solid

HAPPY COOKING!
Read More »

Thursday, June 30, 2016

Mango Roll Ups (Toddler Snack)

0
It is Mango season everywhere. I think June-July is the peak season for mangoes. My family, especially my husband is absolutely in love with mangoes. When I see these mangoes, my mind is going back to my childhood days, the vacation days which we spent at my Mother’s sister (we call her Chechiyamma) house. We usually spent one or two days every year over there but I do have lot of beautiful memories about those vacation days. One of them is, every morning when we kids wake up, we used to run to a mango tree close to Chechiyamma house and collect all mangoes in a basket and without wait for the fruit to be cut, just rip off the skin and go for the fresh fruit. What a beautiful days!! I really miss those days!

But what I believe is “Bygone Days Were Wonderful But The Coming Days Are Beautiful”!

OK, now let's us jump into our new recipe. This week, I am sharing a toddler snack recipe “Mango Roll Ups”. This is a perfect summer time snack, especially when you are outdoor.

Mango Roll Ups

Ingredients
Ripe Mangoes-5, peeled and cut
Sugar- 1 Tbsp
Lemon juice- 1 Tbsp

Method
Step 1: Add mangoes, sugar and lemon juice together into a blender and puree them until smooth.

Step 2: Preheat the oven to 200ºF.

Step 3: Now spread the puree evenly on parchment paper in a baking pan.

Step 4: Bake it for about 3 to 4 hours (until it is fully dried). It totally depends on the thickness of puree which you spread on sheet. For me, it took almost 5 hours to completely dry the mango puree since I had a thick puree layer. Next time when I make, I will definitely make it thinner.


Step 5: When it is fully dried, remove the roll ups from the oven and cut into long strips and then roll up the strips. Mango roll ups are ready!

Ingredients: Mangoes, Sugar and Lemon juice

Peel off mangoes

Blend all ingredients together in a blender

Blend them until smooth puree
Spread mango puree on a baking sheet and bake it until fully dried

HAPPY COOKING!

Read More »

Wednesday, June 15, 2016

Chicken Pasta Soup (For Toddler)

0
Now it is noon here in Texas and I am in the middle of lot of things like cooking, playing Legos with my kid, filling up my pantry boxes….You guys must be thinking now “then, why are you sitting down and writing this post in the middle of all these ?”. hahaaa, that is true, but sometimes I like writing my blog in the middle of everything and take it as a challenge!!!!

It is Summer, season of outdoor activities and fun! but the risk of getting cold and allergic reactions is more in this season. I love all the summer activities but I hate the time when my son is sick and not eating well. I know, a sick kid may not have the appetite to eat, but he still needs nutrition. I always make soup while my son gets sick, especially if he has stuffy nose because warm soup loosens mucus, so he can breathe easier. I usually make chicken soup by adding lot of herbs to boost his immune system. We parents can have this soup too. 
Today I am going to share a soup recipe “Chicken Pasta Soup” with you all. I am sure your family will love this soup. 

Enjoy! Stay healthy!


Ingredients
Chicken breast- 1 medium size, cut into small cube shapes
Red onion- 1, medium size
Tomatoes- 2, medium size chopped
Coconut milk- ~12 OZ
Pasta- Hand full (mix of three pasta, trio italiano)
Butter
Fresh herbs (Cilantro, parsley, mint and basil)
Dry herbs (bay leaves, cloves, peppercorn and anise seeds)
Salt and Pepper, to taste

Method
Step 1:
Cook pasta as per package direction by adding salt, one bay leaf and two cloves. Drain off water.

Step 2:
Heat a large size pot over medium heat and add butter. While butter melts, add dry herbs and onion together. When onion turns transparent add tomato pieces, salt and pepper power. Cook them for about 2 minutes.

Step 3: Now add coconut milk. Stir well and allow it to boil.

Step 4: Add chicken pieces to the boiling coconut milk mixture. Stir very well and add salt. Close the pot with lid and cook until all the chicken pieces cook very well.

Step 5: Now it is time to add all the fresh herbs and cooked pasta. Stir very well and keep boiling for another 1 minute. Chicken Pasta Soup is ready now. Check for salt and pepper.

The smell of that creamy chicken pasta soup is so tempting and your family cannot resist having this.


Serve warm!

Ingredients: Chicken, Pasta, red onion, tomatoes, coconut milk, pepper, salt, dry herbs and fresh herbs

Cook pasta by adding salt and dry herbs

Saute dry herbs, onion and tomatoes in butter

Add coconut milk and boil the mixture

Cook chicken in coconut mixture and add cooked pasta 

Chicken Pasta Soup is ready to serve
HAPPY COOKING
Read More »

Friday, June 3, 2016

Mint Orange Juice (For Toddler)

0
How are you all doing? Here I am sitting on my patio, writing this post and thinking of expanding my herb garden. Since it is summer here in Texas, it is the best time to do gardening. When I was a kid, me, my sister and brother used to do gardening, the funny thing is, every other day, I used to pull out plant from pot to see whether it started to root J. My son was doing the same thing with my plants! Hahaa.., but I could almost stop him by telling “If you pull out the plants, no more butterflies will come to our garden”. He never did that since then, because he loves butterfliesJ.

Today I am going to share with you a beautiful healthy “Mint Orange Juice” recipe, which you all parents can share with your kids. Mint (pudina) is a herb with a variety of potential health benefits. As you all may know, mint is a great breathe freshener.  For kids and adults, mint is a natural remedy for indigestion and it provides instant relief from gas troubles, stomach aches etc. Also, mint gives cooling sensation to the skin and helps in dealing with skin irritations. So try to use this herb in your daily life.


Ingredients
Orange- 1, peeled and segmented
Mint- 3 or 4 fresh leaves
Honey- 1 Tbsp

Method

Add all the ingredients to the blender and blend until mint leaves are fully dissolve in orange juice. You can add a little bit of water to get runny consistency. Mint Orange juice, is ready to drink. Enjoy!


HAPPY COOKING!

Read More »