Customization: 1) At the beginning of the script from step 6, we have this section:

Wednesday, September 27, 2017

Baked Kale Chips

0
As a mom, I agree that it is always not easy to serve healthy vegetables and green leaves to kids in a delicious way. Especially leafy greens like spinach, kale etc. My son likes spinach when I do stir fry, but he always says No… No.. to kale, even if I make stir fried kale. So kale is not there in my every week meal plan. 

Since, I do like kale, I make kale stir fry once in a while. This week, when I was thinking of making kale stir fry, I thought why not make baked kale chips instead of stir fry. After I made kale chips, I asked my little one to close his eyes and try kale chips. Instead of saying kale chips I said, Green chips. He simply ate it and asked for more and more. Crunchy and delicious!! Hope everyone will try this recipe! Enjoy!


Ingredients
Kale- I chose organic one bunch.
Olive oil- 2-3 Tbsp
Salt and pepper, to taste

Method
Step 1: Preheat oven to 350 degrees.
Step 2: Wash kale nicely and pat dry them using paper towel.
Step 3: Remove kale leaves from stem.
Step 4: Spread them on a baking pan. Toss them with olive oil, salt and pepper.
Step 5: Bake them until they crisp, toss them in between. For me, it took about 15 minutes to get crispy chips.


Kale chips are ready to enjoy!

Organic Kale

Wash Kale

Remove stem from kale leaves and spread them on a baking sheet

Toss Kale using Olive oil

Toss Kale using Salt

Bake kale until they crisp

HAPPY COOKING!


Read More »

Friday, August 4, 2017

Lime-Mint Popsicle

0
Summer is in full swing here in Texas! What could be more refreshing than a cool Popsicle in hot summer? I always try to incorporate seasonal flavors into my recipes. Few of my favorite summer flavors are mint, lemon and ginger. So I thought of adding all of them together to make a delicious Popsicle. But, you guys, I was not sure, whether my little buddy would love this. But YES! He loved it. Hope you guys will try this recipe.


Ingredients (~4 large popsicles)
Lime- 2
Mint leaves- ~7
Ginger- Small piece
Sugar- 5 Tbsp (I chose brown sugar)
Water

Method
Add all of the ingredients to the blender and blend until everything combined. Then pour the mixture into the popsicle molds. Fix the lid and keep them in freezer. Once they are frozen, run room temperate water outside the mold so the popsicles can slide out easily. Or you can keep them in room temperature for couple of minutes and slide them out. ENJOY!

Ingredients: Lime, Mint, Ginger, Sugar and water

Popsicle mold

Blend all ingredients and fill in popsicle mold and freeze them

HAPPY COOKING!


Read More »

Thursday, May 11, 2017

A Toy Story for Mother’s Day

0

Mother's Day is just a couple of days away. The other day, I found this anonymous quotation online “A Mother holds her children’s hands for a short while, but their hearts forever”. I thought I would start this blog post with this wonderful writing! I'd also like to dedicate this blog to my beautiful Mother. Thank you for everything Amma! I Love you!

No matter how old you are, where you come from, or what you are we all have or had a mother. She is the only person who accepts you, no matter what mistakes you make. When you become a mother you finally realize, what your mother went through and realize that, bringing a new life into this world is the most amazing and the most difficult thing in this world. 

Sometimes I think that, I am being so silly nowadays. I wish to share a tiny story of me being a silly Mommy. My son absolutely obsessed with vehicle toys, especially Hot wheels cars, Thomas Engine, Construction vehicles….His first car toy was a Hot wheels Red Car and now he has more than 100 hot wheels and still he is excited when he gets a new one. He used to call that Red car as VICA since he got it when he was just started to talk. His Daddy bought that car for him. It was his absolute favorite toy. But somehow VICA missed since few months and once in a while he was asking me “Mama Can we look for VICA (still he calls that car VICA)”, and we both will be looking everywhere for VICA, but we could not find it. I was also little sad while he was asking about VICA. So I bought him almost same Hot wheels Red car, but he was not fully happy with that even though he played with it. Few weeks back while I was cleaning my kitchen I saw something underneath my cooking stove. It was his VICA. I don’t know how much happy I was. When I showed it to my son I cannot express his happiness and he told me to make a call to Daddy to tell that we got back our VICA!! I guess, I am not alone being silly like this but I have become THAT silly Mom and I enjoy it!!


Wishing all of you and your Mother’s a very happy “MOTHER’S DAY”.

Sharing a wonderful recipe of “Blooming Onion” along with today’s post.


Ingredients
Onion: Medium size, 2
For batter
Milk: 2 cups
All-purpose flour- 1 cup
Paprika- 1 Tbsp
Pepper- 1 Tsp
Garlic powder- 1/3 Tsp
All spice powder- 1/3 Tsp
Salt- 1 Tsp
Oil for frying, I chose canola oil

Method

Step 1: Milk batter
In a large size bowl combine milk, all-purpose flour (1/4 cup), paprika, pepper, all spice, garlic powder and salt together. Mix them very well.

Step 2: Onion slicing
Remove onion skin and keep it on a flat surface by face down. Now use a sharp, large knife to slice the onion several times down the center to create petals. Now spread the petals.

Step 3: All-purpose flour mix
Mix remaining all-purpose flour with little bit of salt and paprika.

Step 4: Dip onion in milk batter and take it out. Now sprinkle all-purpose flour mix all over the separated petals. Again dip it in milk batter or pour milk batter in all over the onion petals and then to all-purpose flour mix. Now keep it in the freezer at least for an hour.
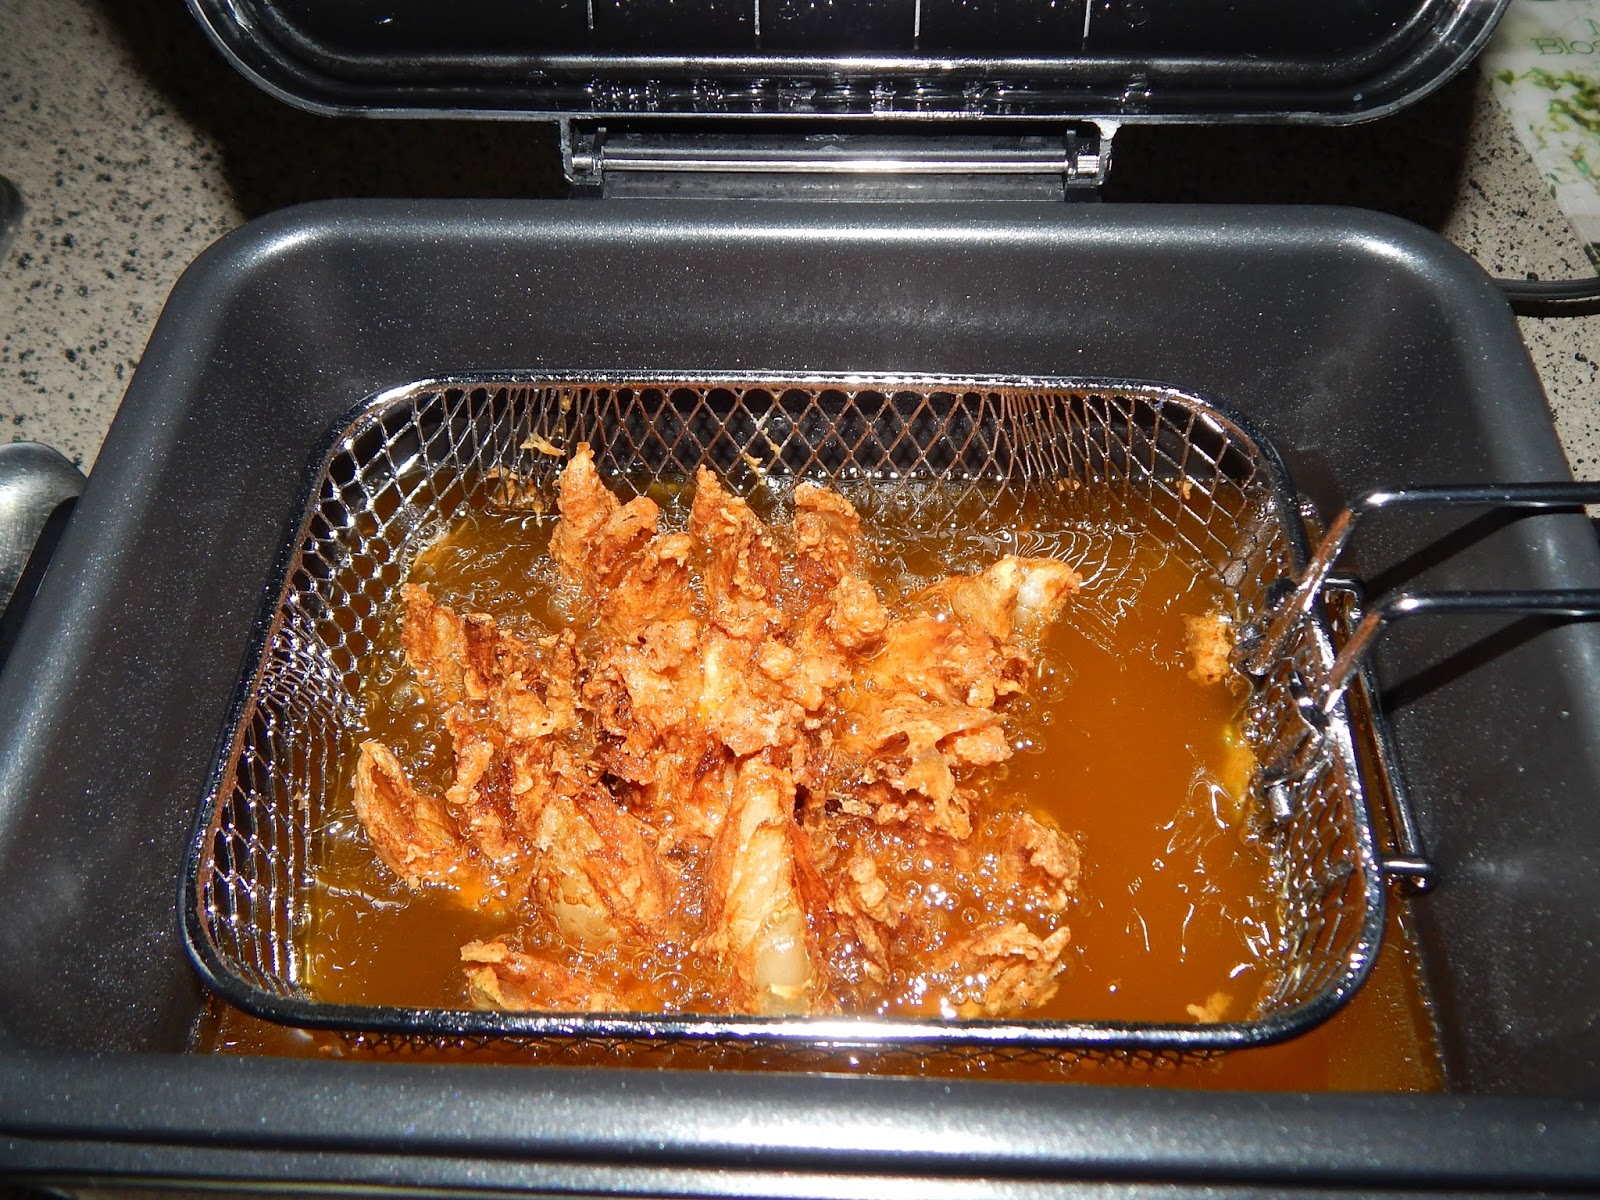
Step 5: Now heat oil in a pan (since I have deep fryer, I used it for frying), and when it becomes hot, fry onion petals until it becomes golden color. Flip it and cook it until you get golden blooming onion. Take it out from oil and let it drain on a paper towel.


Delicious crunchy “Blooming onion” is ready to serve. Serve with ketchup or mayonnaise. If you want to keep the dip inside blooming onion, you need to take out few petals from the center and put small dish for dip in the center. Enjoy!

HAPPY COOKING!

Read More »

Thursday, April 20, 2017

Chocolate Balloon Bowls

1

How was Easter guys? Sorry that I could not post any Easter recipe. Got extremely busy with my son’s Easter Parties at School, community and many Easter Egg hunts. Hope all you had a wonderful Easter. I had a plan to make chocolate bunny this year, since chocolate bunnies have been a part of the Easter tradition for a very long time. But I could not find a Easter Bunny mold, so I had to drop my plan. Instead, I made a special chocolate bowl using balloon. My son was helping me to make this and I cannot explain how happy he was when he saw that chocolate bowl and especially eating ice cream and ice cream bowl!! . You can serve Ice cream or fruits or any dessert in these chocolate bowls.

Hope you all will try this recipe and have fun with family!


Ingredients:

Chocolate candy or chip- 1 Cup (I chose white chocolate)
Vegetable oil- 2 Tbsp
Balloons (I used 3)
Sprinkles

Method:

Step 1:

Melt chocolate in microwave by stirring in every 20 seconds. Add vegetable oil and stir it very well. Set the melted chocolate aside to cool.

Step 2:
Blow up balloons to the size you want bowls (I chose small size).

Step 3:
Line a cookie sheet or baking pan with parchment paper.

Step 4:
Pour one teaspoon of melted chocolate onto the cookie sheet lined with parchment paper to make base for bowl.

Step 5:
Now it is time to dip balloon into melted chocolate. Hold the balloon by its knot and dip into the chocolate to the level you'd like the bowl. 

Step 6:
Now keep bowl upside down and add sprinkles. Place the chocolate dipped balloon on to the chocolate base on parchment paper. Repeat the same procedure with all balloons.

Step 7:
Transfer the cookie sheet to refrigerator and let it be there for about 30-45 minutes. Now take out the cookie sheet from refrigerator and pop each balloon gently with a pin (Stretch out the knot of balloon using fingers and pinch the edge of knot using a pin) and carefully pull out the rest of the balloon. Chocolate bowls are ready now.


Now you can fill the chocolate bowls with any dessert you like. Enjoy!
Ingredients: Chocolate, vegetable oil, balloons and sprinkles (sorry not in picture)


Melt chocolate and add a Tbsp into parchment paper


Blow up balloons and dip in melted chocolate

Keep balloons upside down and add sprinkles

Keep dipped balloons on to the tiny chocolate round on parchment paper and keep it in refrigerator

Pop balloons and pull it out carefully. Chocolate Bowl is ready to fill and enjoy!
HAPPY COOKING!
Read More »

Saturday, March 18, 2017

Apple Puffs

0
Whenever I eat puffs, it takes me back to my childhood. My love for puff began since my school days. Every evening after school we always have snack with family. My Achan (Father) used to buy some snack when he comes back from his office. Egg puff was one of them. Ahhh I miss those days… Still my Achan does same. Whenever I visit my parents he buys egg puff as evening snack. I always notice that, whenever I make egg puffs at home, I never get that taste which I get from my home country.

My little boy is not a spice lover, but sweets!! YES!! So I decided to make sweet version of puff. It was really good and he called it “Apple Pie”.Ha haaa


Ingredients:
Puff Pastry sheet-1
Apples -4 (Cored, peeled and chopped)
Brown sugar- 5 Tbsp
Butter-1Tbsp
Cinnamon- ½ Tsp
Nutmeg- 1/3 Tsp

Method
Before you start making filling, take out the pastry sheet from freezer and let it come to room temperature.

Step 1: Heat pan in medium heat and melt butter.

Step 2: Add chopped apple along with spices, sugar and little bit of water. Cook apple until it is soft.

Step 3: Now, preheat oven to 350 F.

Step 4: Cut pastry sheet into desired size. Add apple filling into each squares and fold the pastry sheet. Using a fork, gently press the edges of the puff pastry sheet to make it tight.

Step 5: Melt some butter and brush it on top of all apple puffs (trick to make them golden brown).

Step 6: Place the prepared apple puffs on a baking sheet lined with parchment paper and bake them for about 20 minutes or until the puff pastry has turned crispy and golden in color.


Apple Puffs are ready to serve. Enjoy!

Apple filling

Add filling in pastry sheet

Fold pastry sheets and brush butter on top

Bake them until golden brown in color
 HAPPY COOKING!

Read More »

Wednesday, February 15, 2017

Fried Apples

4
If your little one is an apple lover, you don’t need to do anything with apple. Just serve fresh organic apple. My son loves apple. Any time of the day he can eat apple. Morning, noon, evening, even at night. So I don’t do a lot of apple cooking at home. Always serve fresh apple. 

But, as my husband says, I like changes, I like to do experiments in my kitchen. Sometimes it will directly go to trash. But that is OK for me, next time it can be a big hit in my family. 

This fried apples recipe is one of the easiest dessert recipes. Hope you will enjoy it!! 


Ingredients

Apples- 2, cored, peeled and cut into medium thick slices.
Butter- 1 Tbsp
Brown sugar-1/4 Cup
Spices- Cinnamon (1/3 Tsp), Nutmeg (1/4 Tsp).
Salt, a pinch.

Method

Step 1: Heat pan over medium heat and melt butter.

Step 2: When butter melts, add brown sugar and little bit of water just to melt sugar. Allow it to boil. Add a pinch of salt to this.

Step 3: Now add apples and spices. Cook them until the apples are soft (apples begin to breakdown).


Fried apples are ready to serve. Serve itself or with vanilla ice cream.

I chose Gala apples. Core, peel and slice apples.

Saute apples in brown sugar mixture

Saute them until apples are soft

HAPPY COOKING!
Read More »

Wednesday, January 25, 2017

Chicken Cheese Ball (Toddler appetizer)

0
This is a wonderful appetizer to cook with your little one. As always I say, it is so much fun when you cook with your kids. It will help to improve their logic skills. I never noticed my son was watching all these cooking shows on TV when I watch. But yesterday, he took three disposable plates from my cabinet and made strawberries and grapes and few more things with his play dough and said “Mama it is time to taste my dishes”. I really got surprised, wow this is the way they do taste test at cooking shows. So once in a while give them a chance!


Ingredients

Chicken- Medium size thigh
Cheese, Parmesan- 1/3 cup
Carrot- 1 small
Potato-1 medium size
Shallots- 3
Egg- 1
Bread crumbs
Salt and pepper, to taste

Method

Step 1: Cook chicken, carrot and potato by adding salt and pepper.

Step 2: Heat a large pan and saute minced shallots. When shallots start to turn brown add all cooked ingredients in the pan and mix for another 3 more minutes.

Step 3: Now grind all the ingredients together in a blender, like the way we make minced chicken.

Step 4: Add cheese to the ground ingredients and make small sized balls.

Step 5: Beat egg in a small bowl and add chicken cheese balls into beaten egg and then roll them in bread crumbs.

Step 6: Heat oil in a pan and fry chicken cheese balls until they turn golden brown color.


Serve warm with mayonnaise or ketchup.

Heat all cooked ingredients in a pan

Add cheese to minced ingredients

Dip Chicken Cheese Balls into beaten egg

Roll balls into bread crumbs

Chicken cheese balls are ready to fry. Fry them until they turn golden brown.


HAPPY COOKING!

Read More »